# Redis 集群与高可用架构
# 前言
随着业务规模的扩大,单机 Redis 已经无法满足高并发、大数据量的需求。Redis 提供了多种集群和高可用解决方案,包括主从复制、哨兵模式、集群模式等。本文将详细介绍 Redis 的各种架构模式、实现原理以及最佳实践。
# 1. Redis 主从复制
# 1.1 主从复制原理
Redis 主从复制是指将一台 Redis 服务器的数据复制到其他 Redis 服务器。前者称为主节点(Master),后者称为从节点(Slave)。
复制流程:
- 从节点向主节点发送 SYNC 命令
- 主节点收到 SYNC 后,执行 BGSAVE 生成 RDB 文件
- 主节点将 RDB 文件发送给从节点
- 从节点加载 RDB 文件
- 主节点将缓冲区的写命令发送给从节点
- 后续主节点的写命令会实时同步给从节点
# 1.2 主从复制配置
1
2
3
4
5
6
7
8
9
10
11
|
bind 127.0.0.1
port 6379
requirepass yourpassword
bind 127.0.0.1
port 6380
replicaof 127.0.0.1 6379
masterauth yourpassword
replica-read-only yes
|
# 1.3 主从复制实现
1
2
3
4
5
6
7
8
9
10
11
12
13
14
15
16
17
18
19
20
21
22
23
24
25
26
27
28
29
30
31
32
33
34
35
36
37
38
39
40
41
42
43
44
45
46
47
48
49
50
51
52
53
54
55
56
57
58
59
60
61
62
63
64
65
66
67
68
69
70
71
72
73
74
75
76
77
78
79
80
81
82
83
84
85
86
87
88
89
|
@Configuration
public class RedisMasterSlaveConfig {
@Bean
public RedisTemplate<String, Object> masterRedisTemplate() {
RedisTemplate<String, Object> template = new RedisTemplate<>();
template.setConnectionFactory(masterConnectionFactory());
template.setKeySerializer(new StringRedisSerializer());
template.setValueSerializer(new GenericJackson2JsonRedisSerializer());
return template;
}
@Bean
public RedisTemplate<String, Object> slaveRedisTemplate() {
RedisTemplate<String, Object> template = new RedisTemplate<>();
template.setConnectionFactory(slaveConnectionFactory());
template.setKeySerializer(new StringRedisSerializer());
template.setValueSerializer(new GenericJackson2JsonRedisSerializer());
return template;
}
@Bean
public LettuceConnectionFactory masterConnectionFactory() {
RedisStandaloneConfiguration config = new RedisStandaloneConfiguration();
config.setHostName("localhost");
config.setPort(6379);
config.setPassword("yourpassword");
return new LettuceConnectionFactory(config);
}
@Bean
public LettuceConnectionFactory slaveConnectionFactory() {
RedisStandaloneConfiguration config = new RedisStandaloneConfiguration();
config.setHostName("localhost");
config.setPort(6380);
config.setPassword("yourpassword");
return new LettuceConnectionFactory(config);
}
}
@Service
public class ReadWriteSeparationService {
@Autowired
private RedisTemplate<String, Object> masterRedisTemplate;
@Autowired
private RedisTemplate<String, Object> slaveRedisTemplate;
public void write(String key, Object value) {
masterRedisTemplate.opsForValue().set(key, value);
}
public Object read(String key) {
try {
return slaveRedisTemplate.opsForValue().get(key);
} catch (Exception e) {
log.warn("从节点读取失败,降级到主节点", e);
return masterRedisTemplate.opsForValue().get(key);
}
}
}
|
# 2. Redis 哨兵模式
# 2.1 哨兵模式原理
Redis 哨兵(Sentinel)是 Redis 的高可用解决方案,由一个或多个 Sentinel 实例组成,可以监控主从节点的运行状态,并在主节点故障时自动进行故障转移。
核心功能:
- 监控:持续监控主从节点是否正常运行
- 通知:当被监控的 Redis 实例出现问题时,通过 API 通知系统管理员
- 自动故障转移:当主节点不能正常工作时,将从节点提升为新的主节点
- 配置提供者:客户端连接 Redis 时,首先连接 Sentinel 获取当前主节点地址
# 2.2 哨兵配置
1
2
3
4
5
6
7
|
port 26379
sentinel monitor mymaster 127.0.0.1 6379 2
sentinel down-after-milliseconds mymaster 5000
sentinel parallel-syncs mymaster 1
sentinel failover-timeout mymaster 10000
sentinel auth-pass mymaster yourpassword
|
配置说明:
sentinel monitor mymaster 127.0.0.1 6379 2 :监控名为 mymaster 的主节点,2 个 Sentinel 确认主节点下线才执行故障转移sentinel down-after-milliseconds mymaster 5000 :主节点 5 秒无响应认为下线sentinel parallel-syncs mymaster 1 :故障转移后,每次同步的从节点数量sentinel failover-timeout mymaster 10000 :故障转移超时时间
# 2.3 哨兵模式实现
1
2
3
4
5
6
7
8
9
10
11
12
13
14
15
16
17
18
19
20
21
22
23
24
25
26
27
28
29
30
31
32
33
34
35
36
37
38
39
40
41
42
43
44
45
46
47
48
49
50
51
52
53
54
55
56
57
58
59
60
61
62
63
64
65
66
67
68
69
70
71
72
73
74
75
76
77
78
79
80
|
@Configuration
public class RedisSentinelConfig {
@Bean
public RedisTemplate<String, Object> sentinelRedisTemplate() {
RedisTemplate<String, Object> template = new RedisTemplate<>();
template.setConnectionFactory(sentinelConnectionFactory());
template.setKeySerializer(new StringRedisSerializer());
template.setValueSerializer(new GenericJackson2JsonRedisSerializer());
return template;
}
@Bean
public LettuceConnectionFactory sentinelConnectionFactory() {
RedisSentinelConfiguration sentinelConfig = new RedisSentinelConfiguration()
.master("mymaster")
.sentinel("127.0.0.1", 26379)
.sentinel("127.0.0.1", 26380)
.sentinel("127.0.0.1", 26381)
.setPassword("yourpassword");
return new LettuceConnectionFactory(sentinelConfig);
}
}
@Service
public class SentinelMonitorService {
@Autowired
private RedisTemplate<String, Object> redisTemplate;
public String getCurrentMaster() {
try {
RedisConnection connection = redisTemplate.getConnectionFactory().getConnection();
String info = connection.info("replication");
connection.close();
return parseMasterInfo(info);
} catch (Exception e) {
log.error("获取主节点信息失败", e);
return null;
}
}
public List<String> getSlaveNodes() {
try {
RedisConnection connection = redisTemplate.getConnectionFactory().getConnection();
String info = connection.info("replication");
connection.close();
return parseSlaveInfo(info);
} catch (Exception e) {
log.error("获取从节点信息失败", e);
return Collections.emptyList();
}
}
private String parseMasterInfo(String info) {
return "master_info";
}
private List<String> parseSlaveInfo(String info) {
return Collections.singletonList("slave_info");
}
}
|
# 3. Redis 集群模式
# 3.1 集群模式原理
Redis 集群(Cluster)是 Redis 3.0 版本推出的分布式解决方案,采用分片(Sharding)方式将数据分散到多个节点。
核心概念:
- 分片:将数据分散到 16384 个哈希槽中
- 节点:每个节点负责部分哈希槽
- 重定向:客户端访问数据时,如果不在当前节点,会返回重定向信息
# 3.2 集群配置
1
2
3
4
5
6
|
port 7000
cluster-enabled yes
cluster-config-file nodes-7000.conf
cluster-node-timeout 5000
appendonly yes
|
# 3.3 集群模式实现
1
2
3
4
5
6
7
8
9
10
11
12
13
14
15
16
17
18
19
20
21
22
23
24
25
26
27
28
29
30
31
32
33
34
35
36
37
38
39
40
41
42
43
44
45
46
47
48
49
50
51
52
53
54
55
56
57
58
59
60
61
62
63
64
65
66
67
68
69
70
71
|
@Configuration
public class RedisClusterConfig {
@Bean
public RedisTemplate<String, Object> clusterRedisTemplate() {
RedisTemplate<String, Object> template = new RedisTemplate<>();
template.setConnectionFactory(clusterConnectionFactory());
template.setKeySerializer(new StringRedisSerializer());
template.setValueSerializer(new GenericJackson2JsonRedisSerializer());
return template;
}
@Bean
public LettuceConnectionFactory clusterConnectionFactory() {
RedisClusterConfiguration clusterConfig = new RedisClusterConfiguration();
clusterConfig.clusterNode("127.0.0.1", 7000);
clusterConfig.clusterNode("127.0.0.1", 7001);
clusterConfig.clusterNode("127.0.0.1", 7002);
clusterConfig.clusterNode("127.0.0.1", 7003);
clusterConfig.clusterNode("127.0.0.1", 7004);
clusterConfig.clusterNode("127.0.0.1", 7005);
clusterConfig.setPassword("yourpassword");
return new LettuceConnectionFactory(clusterConfig);
}
}
@Service
public class RedisClusterService {
@Autowired
private RedisTemplate<String, Object> clusterRedisTemplate;
public void batchSet(Map<String, Object> dataMap) {
clusterRedisTemplate.opsForValue().multiSet(dataMap);
}
public List<Object> batchGet(Collection<String> keys) {
return clusterRedisTemplate.opsForValue().multiGet(keys);
}
public Set<RedisClusterNode> getClusterNodes() {
RedisClusterConnection connection =
clusterRedisTemplate.getConnectionFactory().getConnection().clusterConnection();
return connection.clusterGetNodes();
}
public String getClusterInfo() {
RedisClusterConnection connection =
clusterRedisTemplate.getConnectionFactory().getConnection().clusterConnection();
return connection.clusterGetClusterInfo();
}
}
|
# 4. 高可用架构设计
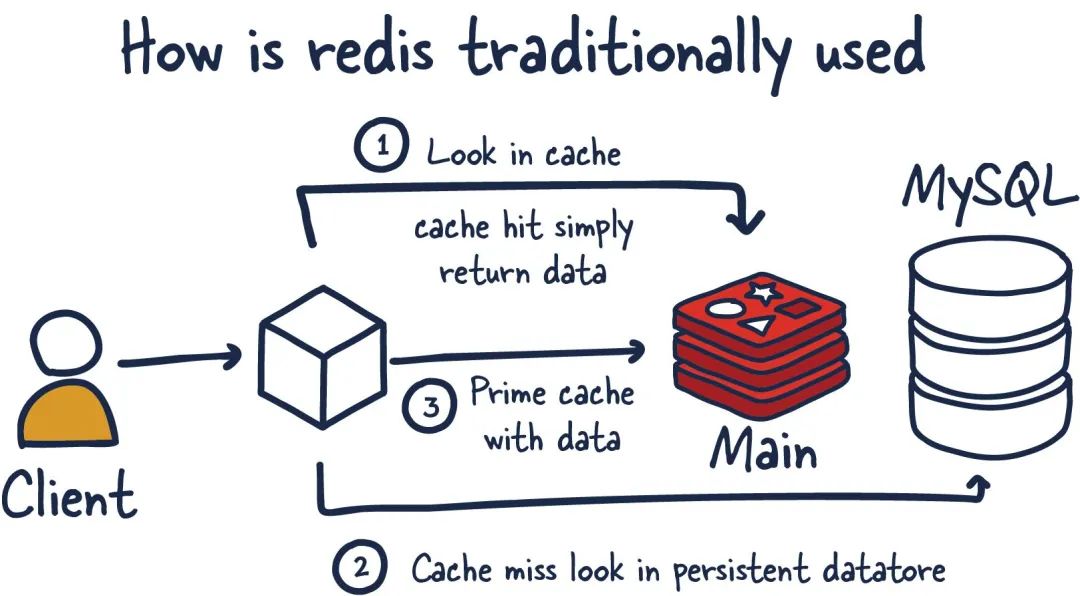
# 4.1 多级缓存架构
1
2
3
4
5
6
7
8
9
10
11
12
13
14
15
16
17
18
19
20
21
22
23
24
25
26
27
28
29
30
31
32
33
34
35
36
37
38
39
40
41
42
43
44
45
46
47
48
49
50
51
52
53
54
55
|
@Service
public class MultiLevelCacheService {
@Autowired
private RedisTemplate<String, Object> redisTemplate;
private final Cache<String, Object> localCache = Caffeine.newBuilder()
.maximumSize(10000)
.expireAfterWrite(5, TimeUnit.MINUTES)
.build();
public Object getData(String key) {
Object data = localCache.getIfPresent(key);
if (data != null) {
return data;
}
try {
data = redisTemplate.opsForValue().get(key);
if (data != null) {
localCache.put(key, data);
return data;
}
} catch (Exception e) {
log.warn("Redis缓存异常", e);
}
data = loadFromDatabase(key);
if (data != null) {
try {
redisTemplate.opsForValue().set(key, data, 30, TimeUnit.MINUTES);
} catch (Exception e) {
log.warn("写入Redis缓存失败", e);
}
localCache.put(key, data);
}
return data;
}
private Object loadFromDatabase(String key) {
return null;
}
}
|
# 4.2 分片策略实现
1
2
3
4
5
6
7
8
9
10
11
12
13
14
15
16
17
18
19
20
21
22
23
24
25
26
27
28
29
30
31
32
33
34
35
36
37
38
39
40
41
42
43
44
45
46
47
48
49
50
51
52
53
54
55
56
57
58
59
60
61
62
63
64
65
66
67
68
69
70
71
|
@Component
public class RedisShardingStrategy {
private final List<RedisTemplate<String, Object>> shardTemplates;
private final int shardCount;
public RedisShardingStrategy(List<RedisTemplate<String, Object>> shardTemplates) {
this.shardTemplates = shardTemplates;
this.shardCount = shardTemplates.size();
}
public RedisTemplate<String, Object> getShard(String key) {
int shardIndex = getShardIndex(key);
return shardTemplates.get(shardIndex);
}
private int getShardIndex(String key) {
return Math.abs(key.hashCode()) % shardCount;
}
public void setToShard(String key, Object value, long timeout, TimeUnit unit) {
RedisTemplate<String, Object> shard = getShard(key);
shard.opsForValue().set(key, value, timeout, unit);
}
public Object getFromShard(String key) {
RedisTemplate<String, Object> shard = getShard(key);
return shard.opsForValue().get(key);
}
public Map<String, Object> batchGet(Collection<String> keys) {
Map<Integer, List<String>> shardKeys = keys.stream()
.collect(Collectors.groupingBy(this::getShardIndex));
Map<String, Object> result = new HashMap<>();
shardKeys.entrySet().parallelStream().forEach(entry -> {
int shardIndex = entry.getKey();
List<String> shardKeyList = entry.getValue();
RedisTemplate<String, Object> shard = shardTemplates.get(shardIndex);
List<Object> values = shard.opsForValue().multiGet(shardKeyList);
for (int i = 0; i < shardKeyList.size(); i++) {
result.put(shardKeyList.get(i), values.get(i));
}
});
return result;
}
}
|
# 5. 监控与运维
# 5.1 集群监控
1
2
3
4
5
6
7
8
9
10
11
12
13
14
15
16
17
18
19
20
21
22
23
24
25
26
27
28
29
30
31
32
33
34
35
36
37
38
39
40
41
42
43
44
45
46
47
48
49
50
51
52
53
54
55
56
57
58
59
60
61
62
63
64
65
66
67
68
69
70
71
72
73
74
75
76
77
78
79
80
81
82
83
84
85
86
87
88
89
90
91
92
93
94
|
@Service
public class RedisClusterMonitorService {
@Autowired
private RedisTemplate<String, Object> clusterRedisTemplate;
public ClusterHealthStatus getClusterHealthStatus() {
RedisClusterConnection connection =
clusterRedisTemplate.getConnectionFactory().getConnection().clusterConnection();
ClusterHealthStatus status = new ClusterHealthStatus();
Set<RedisClusterNode> nodes = connection.clusterGetNodes();
status.setTotalNodes(nodes.size());
long masterCount = nodes.stream()
.filter(node -> node.getFlags().contains(RedisClusterNode.NodeFlag.MASTER))
.count();
long slaveCount = nodes.stream()
.filter(node -> node.getFlags().contains(RedisClusterNode.NodeFlag.SLAVE))
.count();
status.setMasterNodes(masterCount);
status.setSlaveNodes(slaveCount);
String clusterInfo = connection.clusterGetClusterInfo();
status.setClusterState(parseClusterState(clusterInfo));
return status;
}
public Map<String, NodeMemoryInfo> getNodeMemoryInfo() {
RedisClusterConnection connection =
clusterRedisTemplate.getConnectionFactory().getConnection().clusterConnection();
Map<String, NodeMemoryInfo> memoryInfoMap = new HashMap<>();
connection.clusterGetNodes().forEach(node -> {
try {
Properties info = connection.info("memory");
NodeMemoryInfo memoryInfo = new NodeMemoryInfo();
memoryInfo.setNodeId(node.getId());
memoryInfo.setUsedMemory(info.getProperty("used_memory"));
memoryInfo.setUsedMemoryHuman(info.getProperty("used_memory_human"));
memoryInfo.setMaxMemory(info.getProperty("maxmemory"));
memoryInfoMap.put(node.getId(), memoryInfo);
} catch (Exception e) {
log.warn("获取节点{}内存信息失败", node.getId(), e);
}
});
return memoryInfoMap;
}
private String parseClusterState(String clusterInfo) {
return "ok";
}
}
@Data
public class ClusterHealthStatus {
private int totalNodes;
private long masterNodes;
private long slaveNodes;
private String clusterState;
}
@Data
public class NodeMemoryInfo {
private String nodeId;
private String usedMemory;
private String usedMemoryHuman;
private String maxMemory;
}
|
# 5.2 自动故障转移
1
2
3
4
5
6
7
8
9
10
11
12
13
14
15
16
17
18
19
20
21
22
23
24
25
26
27
28
29
30
31
32
33
34
35
36
37
38
39
40
41
42
43
44
45
46
47
48
49
50
51
52
53
54
55
56
57
|
@Service
public class FailoverService {
@Autowired
private RedisClusterMonitorService monitorService;
@Autowired
private NotificationService notificationService;
@Scheduled(fixedRate = 30 * 1000)
public void checkAndFailover() {
try {
ClusterHealthStatus status = monitorService.getClusterHealthStatus();
if (!"ok".equals(status.getClusterState())) {
log.warn("集群状态异常: {}", status.getClusterState());
notificationService.sendAlert("集群状态异常");
}
checkNodeHealth();
} catch (Exception e) {
log.error("故障转移检查异常", e);
}
}
private void checkNodeHealth() {
Map<String, NodeMemoryInfo> memoryInfoMap =
monitorService.getNodeMemoryInfo();
memoryInfoMap.forEach((nodeId, memoryInfo) -> {
long usedMemory = Long.parseLong(memoryInfo.getUsedMemory());
long maxMemory = Long.parseLong(memoryInfo.getMaxMemory());
if (maxMemory > 0) {
double memoryUsage = (double) usedMemory / maxMemory;
if (memoryUsage > 0.9) {
log.warn("节点{}内存使用率过高: {}%", nodeId, memoryUsage * 100);
notificationService.sendAlert(
String.format("节点%s内存使用率过高: %.2f%%", nodeId, memoryUsage * 100));
}
}
});
}
}
|
# 6. 性能优化
# 6.1 连接池优化
1
2
3
4
5
6
7
8
9
10
11
12
13
14
15
16
17
18
19
20
21
22
23
24
25
26
27
28
29
30
31
32
33
34
35
36
37
38
39
40
41
42
43
44
45
|
@Configuration
public class RedisPoolConfig {
@Bean
public GenericObjectPoolConfig<StatefulRedisConnection<String, String>> redisPoolConfig() {
GenericObjectPoolConfig<StatefulRedisConnection<String, String>> poolConfig =
new GenericObjectPoolConfig<>();
poolConfig.setMaxTotal(20);
poolConfig.setMaxIdle(10);
poolConfig.setMinIdle(5);
poolConfig.setInitialSize(5);
poolConfig.setMaxWaitMillis(3000);
poolConfig.setTestOnBorrow(true);
poolConfig.setTestOnReturn(false);
poolConfig.setTestWhileIdle(true);
poolConfig.setTimeBetweenEvictionRunsMillis(30000);
poolConfig.setMinEvictableIdleTimeMillis(60000);
poolConfig.setNumTestsPerEvictionRun(3);
return poolConfig;
}
@Bean
public LettuceConnectionFactory optimizedConnectionFactory() {
LettuceClientConfiguration clientConfig = LettucePoolingClientConfiguration.builder()
.poolConfig(redisPoolConfig())
.commandTimeout(Duration.ofSeconds(2))
.shutdownTimeout(Duration.ZERO)
.build();
RedisClusterConfiguration clusterConfig = new RedisClusterConfiguration();
return new LettuceConnectionFactory(clusterConfig, clientConfig);
}
}
|
# 6.2 Pipeline 优化
1
2
3
4
5
6
7
8
9
10
11
12
13
14
15
16
17
18
19
20
21
22
23
24
25
26
27
28
29
30
31
32
33
34
35
36
37
38
39
40
41
42
43
44
45
46
47
48
49
50
|
@Service
public class RedisPipelineService {
@Autowired
private RedisTemplate<String, Object> redisTemplate;
public void batchWrite(Map<String, Object> dataMap, long expireTime, TimeUnit unit) {
redisTemplate.executePipelined(new RedisCallback<Object>() {
@Override
public Object doInRedis(RedisConnection connection) throws DataAccessException {
dataMap.forEach((key, value) -> {
connection.set(key.getBytes(), SerializationUtils.serialize(value));
connection.expire(key.getBytes(), unit.toSeconds(expireTime));
});
return null;
}
});
}
public Map<String, Object> batchRead(Collection<String> keys) {
List<Object> results = redisTemplate.executePipelined(new RedisCallback<Object>() {
@Override
public Object doInRedis(RedisConnection connection) throws DataAccessException {
keys.forEach(key -> connection.get(key.getBytes()));
return null;
}
});
Map<String, Object> resultMap = new HashMap<>();
List<String> keyList = new ArrayList<>(keys);
for (int i = 0; i < keyList.size() && i < results.size(); i++) {
Object result = results.get(i);
if (result != null) {
resultMap.put(keyList.get(i), result);
}
}
return resultMap;
}
}
|
# 7. 实战案例
# 7.1 电商秒杀系统架构
1
2
3
4
5
6
7
8
9
10
11
12
13
14
15
16
17
18
19
20
21
22
23
24
25
26
27
28
29
30
31
32
33
34
35
36
37
38
39
40
41
42
43
44
45
46
47
48
49
50
51
52
53
54
55
56
57
58
59
60
61
|
@Service
public class SeckillService {
@Autowired
private RedisTemplate<String, Object> redisTemplate;
@Autowired
private RedisShardingStrategy shardingStrategy;
public void warmupInventory(Long productId, int stock) {
String inventoryKey = "seckill:inventory:" + productId;
shardingStrategy.setToShard(inventoryKey, stock, 24, TimeUnit.HOURS);
String userKey = "seckill:users:" + productId;
shardingStrategy.setToShard(userKey, new HashSet<>(), 24, TimeUnit.HOURS);
}
public boolean seckill(Long productId, Long userId) {
String inventoryKey = "seckill:inventory:" + productId;
String userKey = "seckill:users:" + productId;
String luaScript =
"local inventoryKey = KEYS[1] " +
"local userKey = KEYS[2] " +
"local userId = ARGV[1] " +
"local inventory = tonumber(redis.call('get', inventoryKey)) " +
"if inventory <= 0 then " +
" return 0 " +
"end " +
"if redis.call('sismember', userKey, userId) == 1 then " +
" return -1 " +
"end " +
"redis.call('decr', inventoryKey) " +
"redis.call('sadd', userKey, userId) " +
"return 1 ";
DefaultRedisScript<Long> redisScript = new DefaultRedisScript<>(luaScript, Long.class);
RedisTemplate<String, Object> shard = shardingStrategy.getShard(inventoryKey);
Long result = shard.execute(redisScript,
Arrays.asList(inventoryKey, userKey),
String.valueOf(userId));
return Long.valueOf(1).equals(result);
}
}
|
# 7.2 分布式计数器
1
2
3
4
5
6
7
8
9
10
11
12
13
14
15
16
17
18
19
20
21
22
23
24
25
26
27
28
29
30
31
32
33
34
35
36
37
38
39
40
41
42
43
44
45
46
47
|
@Service
public class DistributedCounterService {
@Autowired
private RedisTemplate<String, String> redisTemplate;
public long increment(String key) {
return redisTemplate.opsForValue().increment(key);
}
public long increment(String key, long delta) {
return redisTemplate.opsForValue().increment(key, delta);
}
public long increment(String key, long delta, long expireTime, TimeUnit unit) {
String luaScript =
"local current = redis.call('get', KEYS[1]) " +
"if current == false then " +
" redis.call('set', KEYS[1], ARGV[1]) " +
" redis.call('expire', KEYS[1], ARGV[2]) " +
" return tonumber(ARGV[1]) " +
"else " +
" local result = redis.call('incrby', KEYS[1], ARGV[1]) " +
" redis.call('expire', KEYS[1], ARGV[2]) " +
" return result " +
"end";
DefaultRedisScript<Long> redisScript = new DefaultRedisScript<>(luaScript, Long.class);
return redisTemplate.execute(redisScript,
Collections.singletonList(key),
String.valueOf(delta),
String.valueOf(unit.toSeconds(expireTime)));
}
}
|
# 8. 最佳实践总结
# 8.1 架构选择指南
| 场景 | 推荐架构 | 优点 | 缺点 |
|---|
| 读写分离 | 主从复制 | 配置简单,读性能提升 | 写性能瓶颈,单点故障 |
| 高可用 | 哨兵模式 | 自动故障转移,高可用 | 配置复杂,资源消耗 |
| 大数据量 | 集群模式 | 水平扩展,高可用 | 客户端复杂,事务限制 |
| 超高性能 | 多级缓存 | 响应快,减轻 Redis 压力 | 数据一致性复杂 |
# 8.2 性能调优
- 连接池配置:合理设置连接池参数
- 内存优化:选择合适的数据结构,设置 maxmemory
- 持久化配置:根据业务需求选择 RDB/AOF
- 网络优化:使用内网通信,减少网络延迟
- 客户端优化:使用 Pipeline,批量操作
# 9. 总结
Redis 集群和高可用架构是构建大规模分布式系统的重要组成部分。本文从主从复制、哨兵模式、集群模式三个方面详细介绍了 Redis 的各种架构方案,并提供了完整的实现代码和最佳实践。